Zuma Adventure
Description
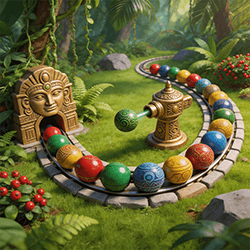
Zuma Adventure About This Game Zuma Adventure is a marble-shooting color puzzle built around aiming, matching, and pressure control. A moving line of colored marbles travels along a track toward the exit, and your goal is to clear the line before it reaches the end. The main challenge is not only hitting the right color. Good play depends on track pressure, color priority, shot timing, and combo planning. A small clear near the danger zone can be more useful than a large match far away, especially when the foremost group is already close to the exit. As levels become more difficult, players may need to respond to tighter paths, faster movement, denser color mixes, or special elements when they appear. The best approach is to keep the track organized, avoid random shots, and choose clears that give you more space to work with. How to Play Start each level by reading the track. Look at where the marbles enter, where they are moving, and where the exit is. This helps you decide which section is safe and which section needs immediate attention. Basic play flow: 1. Read the track direction and identify where the marble line is moving. 2. Check the launcher color before choosing a target. 3. Aim at a matching color group already on the track. 4. Connect three or more same-colored marbles to clear them. 5. Watch for pull-back clears when separated same-color groups connect after a match. 6. Protect the danger zone whenever the foremost group gets close to the exit. If the marble line reaches the exit, the level fails. If you clear the current line before that happens, the level is completed. Specific buttons, special effects, or booster behavior may vary by version or level, so focus first on clean matching, safe placement, and defensive decision-making. Beginner Strategy Guide The best beginner strategy in Zuma Adventure is to treat every shot as a board-management decision. A shot should either clear marbles, reduce danger, prepare a combo, or keep the track easier to manage. If a shot does none of those things, it may create more trouble than value. Shot Priority Order Use this order when you are not sure where to shoot: 1. Clear marbles near the exit if the line is close to failing. 2. Make a direct three-color match when it helps immediately. 3. Set up a combo only when the critical area is still safe. 4. Place an unmatched marble beside the same color when a direct match is not available. 5. Avoid narrow mixed sections unless the shot clearly improves the position. This priority system helps new players avoid random shooting. A clean small match in the danger zone is often better than a larger match far from the exit. When the Foremost Group Is Close to the Exit If the foremost group is near the finish point, stop chasing stylish clears in the back of the track. Focus on stabilizing the critical area first. Good emergency shots usually do one of these things: • Remove marbles from the front section. • Pull the line backward after a clear. • Open space before the final bend. • Connect a quick combo only if it helps the danger zone. Do not spend several shots building a long setup while the line is already close to failure. In pressure moments, survival comes before score. When the Launcher Color Does Not Match Sometimes the loaded marble will not give you a direct match. The worst response is to fire it into a tight mixed section just to get rid of it. A better approach is: • Place the marble beside the same color if that color is available. • Put it in a low-pressure section if no useful match exists. • Avoid splitting two colors that are close to forming a match. • Use the shot to prepare the next color instead of forcing a weak clear. A color that cannot clear immediately can still be useful if it keeps the track organized. How to Create Better Combos The strongest clears often happen when two same-color groups are separated by one or two marbles of another color. If you clear the blocker between them, the two matching groups may pull together and disappear as a follow-up clear. Example: • A red group is on one side. • Another red group is nearby. • A small blue group sits between them. • Clear the blue group first. • The red groups connect and may trigger another clear. This is the basic logic behind chain-clearing. It works best when the danger zone is under control and you have enough time to set up the middle clear. Safe Shot vs Risky Shot Shot Type · Better Choice Safe shot · Completes a match or reduces pressure near the exit Setup shot · Prepares a combo while the critical area is still safe Risky shot · Adds a random color into a tight mixed section Emergency shot · Clears the foremost group before it reaches the end If a shot does not clear, prepare, or protect, it is probably risky. Special Effects and Booster Timing When a level provides special effects, use them to solve real pressure instead of spending them immediately. A useful effect should either reduce danger near the front, slow down a difficult section, clear a crowded area, open a blocked color group, or help you aim at a narrow gap. Do not waste special effects when the board is already safe. Their best value comes from fixing danger, opening blocked colors, or turning a crowded section into a manageable one. Dealing with Complex Track Layouts If a level includes a more complex path, do not treat every visible marble as equally important. Always prioritize the route or section closest to the exit, because that is where failure is most likely to happen. When part of the line becomes harder to read, focus on the color order you can still see and prepare safer clears near the danger zone. If the track bends sharply or overlaps visually, avoid risky shots into crowded areas unless you are sure the marble will complete a match or reduce pressure. For confusing layouts, divide your attention in a simple order: first check the critical area, then look for direct matches, then consider combo setups. This keeps your decisions stable even when the track becomes harder to read. Strategy for Fast or Confusing Levels When the line moves faster or the colors become more mixed, simplify your decisions: • Clear the critical area first. • Avoid long setup shots unless the track is stable. • Keep colors grouped instead of scattering them. • Use special effects only when they solve an immediate problem. • Watch the next shot if the game shows it, but do not ignore current danger. Fast levels punish messy shooting. Clean, defensive clears usually work better than risky combo attempts. Common Mistakes Only looking at the nearest marbles The closest target is not always the best target. Check the danger zone often, especially when the track bends near the exit. Chasing big matches in the wrong area A large match far from danger may look useful, but it does not help if the foremost group is about to reach the end. Shooting unmatched colors into narrow gaps This can split useful color groups and make future clears harder. If the current color does not match, place it where it causes the least damage. Ignoring separated same-color groups Two groups of the same color with a small blocker between them are often a combo opportunity. Clear the blocker first when the critical area is safe. Using special effects too early Special effects are most valuable when they fix a real problem. Save them for crowded sections, fast movement, blocked colors, or dangerous pressure near the exit. Playing too fast after one successful clear A clear can change the whole track. Pause briefly after each important match and check whether the line pulled together, opened a combo, or created a new danger area. Trying to force combos under pressure Combos are useful, but not when the line is close to the end. In emergency situations, take the safe clear first. Ignoring difficult track shapes Sharp turns, tight paths, or visually crowded sections can hide the real danger. When the layout becomes harder to read, return to the basics: protect the exit, make clean matches, and avoid clutter. FAQ How do you play Zuma Adventure? Aim the launcher at matching colors on the moving track. Connect three or more marbles of the same color to clear them before the line reaches the end. What should beginners focus on first? Beginners should focus on the danger zone, clean three-color matches, and avoiding random shots that make the track harder to manage. What should I do when the launcher color does not match? Place the marble beside the same color if possible. If there is no useful match, put it in a low-pressure area and prepare for the next shot. How do you create chain reactions in Zuma Adventure? Look for two same-color groups separated by a small group of another color. Clear the middle group so the matching sides can pull together and possibly clear again. What is the best strategy for fast-moving levels? Play defensively. Clear the foremost group first, avoid risky setup shots, and use special effects only when they reduce immediate pressure. When should boosters or special effects be used? Use them when the line is close to the end, when colors are badly mixed, or when one effect can open several useful matches. Do not waste them while the board is already under control. How can I improve my level results? Focus on cleaner matches, faster recovery after each clear, and well-timed combos. Completing the stage safely should come before risky high-score attempts. Are boosters, scores, or level results real prizes? No. Boosters, scores, effects, and level progress in Zuma Adventure are virtual in-game elements only. Editorial Note This guide focuses on gameplay explanation and beginner strategy for Zuma Adventure. It describes marble launching, color matching, track pressure, combo planning, and defensive decision-making based on the game-style mechanics discussed on this page. Any scores, boosters, effects, rewards, or level progress mentioned in this guide refer only to virtual in-game elements. This article does not claim an official relationship with any other brand, developer, publisher, or franchise.